Thursday, January 31, 2008

Designing the Backwoods Drifter

Another Mississippi Backwoods Drifter is currently coming together in the shop, this one for a customer in Louisiana. I'll update on this particular project as it nears completion, but writing about the sharpie type of sailboat yesterday got me thinking about this particular design again.

The latest Backwoods Drifter under construction

A Flat-Bottomed Design:

Yesterday I wrote about a unique type of sailboat with a flat bottom, called a Sharpie. Flat-bottom craft of many other sizes and types have been around a lot longer than the specialized sharpie sailing vessels. As a stable cargo carrier nothing beats a flat bottomed vessel and ancient versions have been unearthed throughout the world and are still found in use today, from giant barges pushed or pulled by diesel towboats to the ubiquitous outboard-driven john boat skiffs that are so popular among fishermen.

In 1998 I built a 12-foot stitch and glue wooden john boat for my father to replace the aging and heavy fiberglass model he had owned since my childhood. This older johnboat was a better design for creek fishing than many of the newer models available today, as it was narrow and therefore easier to paddle than john boats designed strictly for accommodating an outboard motor. I based the new wooden boat loosely on the lines of this older johnboat, staying with the 12-foot overall length, the 30-inch maximum width on the flat bottom hull, and the maximum beam at the gunwales of 40-inches. Although my dad used it with a 3.5 hp outboard for lake fishing, my canoeing buddy, Ernest Herndon and I took it out for a paddle of several miles on a large lake and found it quite easy to move along. Ernest asked me if I could design a similar boat with double ends, like the original johnboats and bateaus from the days before the advent of outboard motors. The result of this casual conversation, completed a few weeks later, was the original Backwoods Drifter, which turned out to be everything Ernest and I expected and more.

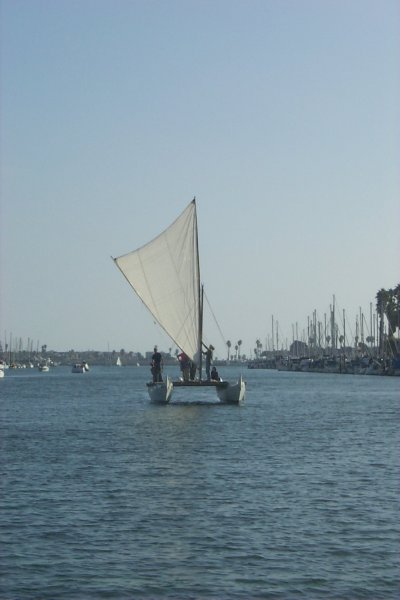
Ernest Herndon’s enthusiasm for this boat remains strong ten years later, and he has used it for countless day trips and a few multi-day river camping trips across the Deep South. Experienced canoeists and kayakers might at first glance look at this flat-bottomed design and dismiss it as oversimplified and unsophisticated. But besides the barge and johnboat, flat bottom craft are still used in rough, windswept bays and even in unprotected coastal waters. The flat-bottomed dory is one type that can handle breaking waves, and some of these are used off surf-bound beaches and to negotiate some of the most difficult river rapids in conditions that would destroy most boats. And as I've already written, the Sharpie type of sailboat evolved as a flat-bottom working vessel designed to carry loads disproportionate to its size, but is still found in use as a cruising yacht due to its extreme shallow draft and seaworthieness.

The key to designing a good flat-bottomed boat is incorporating the right amount of rocker in the bottom and flare in the sides for the intended purpose. Extreme rocker along the bottom is good for rough water and quick maneuverability, such as in rapids, but the trade off is decreased tracking ability, and load-carrying capacity. As the speed and ease of paddling increases with waterline length, it is an advantage to have a fairly long waterline with just enough rocker at the ends to allow quick turning. A strong upswept sheer with raised bow and stern can be an advantage in a choppy, breaking sea, but too much freeboard in the ends creates excessive windage and makes the boat hard to control in breezy conditions. Since the Backwoods Drifter is designed for quieter, more protected waters, the sheer has been kept a bit flatter and the ends, though square, are substantially narrower than the amidships sections.

Some might wonder why not bring the ends to a point, like a canoe or a pirouge, but to do so in such a short length would compromise a lot of the stability of this boat. One of the chief advantages of the design over a canoe is the stand-up stability. With a bottom that is still 18 inches wide at each end, the Backwoods Drifter is much more stable than a canoe this short, which is why most canoes are at least 14 feet or longer. Unlike in a canoe or pirouge, in the drifter you can stand in any part of the bottom or sit right out on the end platforms without fear of capsize.

This photo of a finished Drifter shows the long flat midships section

On the subject of stability, the flat-bottom design, of course, has lots of initial stability. Although many flat-bottom boats are lacking in secondary stability, that doesn’t have to be the case if the right amount of flare is incorporated into the hull sides. This flare allows the boat to be paddled in a “heeled-over” angle, putting the chine edge into the water to form a “V,” which aids in tracking, and providing a stable surface for the boat to grip the water in this position. The Backwoods Drifter is stable on its side right up to the point where the gunwale dips into the water. Paddling in the leaned position is ideal for solo river travel, as you can reach the water easier and use a guide or J-stroke to paddle on the low side of the boat.

The symmetrical ends and sliding middle seat makes it easy to set up the Backwoods Drifter for solo or tandem paddling. A solo paddler can sit on the middle seat with it moved aft or with two paddlers one can sit on one of the platforms (which would then become the stern) with the forward paddler on the middle seat slid to the forward position. Since like a canoe, both ends are the same, either end of the boat can be the bow or stern. On a gentle flowing backwoods stream like Mississippi’s Black Creek – the kind of waterway this boat is perfect for – one can sit or stand, paddle leaned or upright, and spin around to drift backwards or turn in slow circles while looking up at the overhanging trees and daydreaming. On such streams the boat allows you to become one with the water, and it's this connection that is what backwoods drifting is all about.

If you want to see more photos of this design you can find them on my Backwoods Drifter page.

Wednesday, January 30, 2008

What is a Sharpie?

A 28-foot Egret Sharpie pulled right up to a beach

I was talking with another Wharram enthusiast friend of mine the other day on the phone and mentioned something about Reuel Parker and his sharpie designs, expecting that anyone interested in sailing would be familiar with them. But, even more so than multihulls, the sharpie as a unique type of sailing vessel that evolved to suit a particular need in a specific locale is not widely written about in modern sailing literature. The sharpie is not an all-around, general purpose type of craft, and those who sail and build them do so because they understand their unique capabilities and limitations and find them ideal for their purpose.

For much of the kind of cruising I like to do, in the off-the-beaten track areas of the Gulf of Mexico where there are many low-lying islands and shallow water bays, the sharpie would be ideal for my needs too, so I've have spent many hours studying sharpie designs and reading anything available that I could find about them. Coming from a sea kayaking background, having traveled thousands of miles of coastline in such a simple, lightweight craft in which water depths can generally be disregarded, it was natural that I was drawn to the sharpie type when my interest turned to sailboats. No sailboat can go everywhere a 17-foot kayak can go, but the sharpie is one type that can navigate extreme shoal water and be safely beached, even in the larger designs.

Many of these designs are so appealing and so simple and inexpensive to build that if my needs for a boat were simply to cruise the local waters of the Gulf coast and the Florida Keys, I would be building one today. The only limitation of the sharpie type is in long, bluewater passages, as they must be quite large to be safe for this kind of sailing. But according to those who have done it, even a large sharpie can be built in a fraction of the time and for much less money than any other wooden boat of the same size. The reason for this is in the design. Sharpies were developed in the mid-19th century as no-nonsense working vessels built by the end-users, who did not have the refined boatbuilding skills or the time to build complex, round bottomed hulls. The sharpie as a type is characterized by the flat bottom, and it is this flat bottom that allows extreme shallow draft and great load carrying ability - not to mention easy construction out of common building materials. This made them perfect for the needs of the east coast oyster industry before sails were replaced by the internal combustion engine.

Sharpies also proved to be fast and handy under sail, making them even better suited for their tasks as workboats, and also leading to their adaptation as cruising and racing yachts. The type was made famous in time by designers like Howard L. Chapelle and examples such as Commodore Ralph Munroe's Egret, a 28-foot double ender designed specifically for the shallow inlets of south Florida and the rough Gulf Stream.

At first glance, one would think that the flat-bottomed hull would be totally unsuitable for rough water, and it's true that pounding can occur, especially while motoring on modern sharpies. But under press of sail, when the hull is heeled well over, the hard chine between hull bottom and topsides presents a nice V-shape to the waves. This hard chine aides in preventing leeway and most designs have retractable centerboards or leeboards for better windward performance where the water is deep enough. The only real limitation for offshore use is the fact that most designs are not self-righting like deep-keeled monohulls, due to having a higher center of gravity with their ballast inside. This is the trade-off for shallow draft, but for most coastal and short distance island-hopping where weather windows can be taken advantage of, it is not an issue.

Quite a few modern designers offer their renditions of the sharpie type for those who want to build, but one designer who stands out in his knowledge of these boats is Reuel B. Parker, who literally wrote the book on them:

"FAST, SEAWORTHY, ECONOMICAL, STABLE, EASY TO BUILD, floats on a heavy dew..." These are the sharpie superlatives from the back cover of Reuel B. Parker's book about the history, design, theory and construction methods for a unique type of American sailing vessel:


The Sharpie Book is a complete overview of the type and begins with the history and evolution of sharpies and details several of the more famous examples and how they were used. This is followed by a description of the traditional methods of construction used to build working sharpies for those inclined to build one the old way. But the heart of the book focuses on the methods and materials of modern sharpie construction, and this is one book that has enough detail, including lines and offsets, to build the featured boats without the need for additional plans. Parker even includes instructions on sailing and handling the boats, as well as long term maintenance. The models offered in the design pages range from a simple 14-foot Flatiron Skiff to such cruising designs as the 36-foot San Juan Double-ended Sharpie and the 38-foot Nonpareil Sharpie Yacht.

Construction details for 28-Egret Sharpie from The Sharpie Book


A 28-foot Egret Sharpie floating in mere inches of water

Some day I hope I'll have an opportunity to build one of these sharpie designs, either for a customer or to sail myself. There's a lot of appeal in the simplicity of a 25-30-foot sharpie that can float in less than a foot of water and be trailered anywhere in the country for exploring new cruising areas. While the Tiki 26 catamaran I'm building is lightweight, shallow draft, and can be trailered, getting it from trailer to water or vice versa will likely be a half day ordeal. With a sharpie like the Egret above, you just step the two unstayed masts and back it down the ramp like launching a runabout. Reading The Sharpie Book and looking a road atlas with all the places reachable by trailerable sailboat will definitely get you to dreaming.

For more on Reuel B. Parker's designs, visit his website: http://www.parker-marine.com/index.htm

Tuesday, January 29, 2008

Raka Epoxy

In my last post about the debate among traditional boatbuilders regarding the use of epoxy resin, you could see two brands of epoxy formulated for boatbuilding in the photo. One, of course, is the well-known and widely popular West System, and the other, in the plastic one-gallon jugs is Raka Epoxy as shown above.

For about 8 years now, Raka has been my epoxy of choice. Before that I used System Three epoxy almost exclusively, and of course, I've used a fair amount of West System. Like many, I believed that the major companies like West and System Three were the only ones that could be trusted, but then I began to meet and talk with other boatbuilders who were using Raka for both large and small projects. Everyone that used it liked it, and they were saving a lot of money on their materials lists as Raka has been consistently less expensive than the big name formulations. What finally convinced me of its suitability for building boats was the Bolger Nymph dinghy that my brother started building with this epoxy, but later abandoned before finishing the project. He had assembled the hull and laminated the fiberglass sheathing over the exterior, and then left the hull with the unpainted epoxy turned upside down out in the weather for more than a year. When he later gave me the hull so I could finish it and use it for a tender to my sailboat, Intensity, I examined the epoxy coatings and fillets and found nothing wrong with them at all. I completed the boat using the Raka epoxy he had left over, and it is still in service today.

After that experience I began using Raka to rebuild the interior of Intensity, then to build several small boats, including a few Backwoods Drifters. I found I preferred Raka epoxy for many reasons, and price was the least of them. For one thing, the viscosity is better for coating wood and wetting out fiberglass. I found this epoxy to excel at clear-coating wood that would later be finished bright, with varnish over the epoxy. There was less discoloration and darkening of the grain than with the epoxies I had used previously. I've also found that Raka epoxy has less tendency to blush when curing, especially in the often humid conditions I work in here in Mississippi. I have yet to have a failure to cure or a bad batch, and as long as I've been using it every order of Raka epoxy has performed the same. I can discern no difference in the strength of cured joints compared to the other epoxy brands, and I have never had a failure of any joint made with it.

The basic Raka formulation is mixed in a 2:1 ratio, using the 127 resin, and two choices of hardeners: the 610 fast and the 606 slow. Raka offers other formulations with different properties, but I've found that these are all I need. The fast hardener is excellent in cold weather or for small, easily handled jobs in hot weather. The slow hardener is what you need for big laminating jobs where you need more working time, especially in hot weather. The two hardeners can also be combined in different combinations in larger batches, yielding a medium curing speed.

To learn more about Raka epoxy you can go to the company website and read the user manual: http://www.raka.com/UserManual.html There you will find a product description as well as instructions for proper use of the material. Raka is based in Ft. Pierce, Fl and the product is not found in retail stores, but can be ordered directly from Larry, the owner, by calling the telephone numbers on the website.

For another opinion on different epoxy formulations, read the results of this test performed by a wood-epoxy composite kayak builder on the One Ocean Kayak website. You can see how Raka performed as compared with the top name-brand epoxies.

http://www.oneoceankayaks.com/Epoxtest.htm

http://www.oneoceankayaks.com/Epoxresl.htm

Monday, January 28, 2008

Epoxy Debate

Yesterday I posted links to online boat-related discussion forums I like to read. The Wooden Boat forum, associated with the magazine, Wooden Boat was at the top of the list. This forum is full of informative posts related to wooden boat building. On the forum you'll find builders of just about every kind of boat imaginable that can be made of wood, from the modern composite racing craft to replicas of tried and true working vessels of the last and prior centuries.

With so many builders of different boats, disagreement is bound to emerge, and when the subject of epoxy comes up this is always the case. I take an interest in these discussions about epoxy, because so much of my boatbuilding and other woodworking depends on it. I first started using it for laminating wood around 1991, when I began building my own double-bladed kayak paddles out of red cedar, ash, and mahogany. The paddle shafts and blades were constructed by gluing together many layers of thin strips of these materials sawn on the tablesaw and then glued up into a block roughly the dimensions of a paddle. Shaping was done with various power and hand tools, and after hours of hard work a fine paddle with feathered blades offset to 90 degrees was the result. I used these paddles for hundreds of miles of kayak touring, and never had a failure.

My next test of epoxy as an adhesive was in 1993-94, when I took an interest in traditional archery and began making wooden longbows, many of them laminated with a layer of planed bamboo on the back, which is the high tension side away from the shooter. I built several bows like this with draw weights of up to 80 pounds. If there was ever a test of an adhesive, the rigorous tension and compression cycles that a glue line is put through when a bow is drawn and then suddenly released is among the most extreme. Like the paddles, I never had a failure of an epoxy glue joint in any of my bows.

From paddles and bows I went on into wooden boat building, beginning with a 19-foot woodstrip canoe that eventually evolved into a decked sailing trimaran canoe with two 15-foot woodstrip outriggers. This type of construction depends on a layer of 6-oz. fiberglass cloth laminated on both the interior and exterior of the hull to reinforce the wooden shell, which is made of red cedar and cypress strips only 1/4 inch thick. In this construction there are no internal frames or ribs to hold the hull in shape or to strengthen it - only the epoxy saturated fiberglass. The result is a stiff, lightweight hull that never leaks or loses its shape. This first canoe I built, Seldom Seen, is as structurally sound and beautiful today as it was when I launched it in 1995.

I could go from here, describing everything I've built with epoxy since, from wooden bathroom showers to more than a dozen stitch and glue plywood boats. Suffice to say, I'm a believer in epoxy. Modern epoxy resins make it possible for those of us willing to experiment to create incredible composite structures using wood, the most beautiful of all natural materials, in ways never imagined before. Those woodworkers and boatbuilders unwilling to use it out of some resistance to modern technology have no idea what they're missing.

Back to the Wooden Boat Forum debate that inspired this post:

This was started by someone who read a dire warning in one of Larry Pardey's books about the use of epoxy as an adhesive in wooden boat building. Most anyone who has had an interest in sailboat cruising has heard of Lin and Larry Pardey, the famous cruising couple who built their 24-foot Lyle Hess designed wooden cutter, Serafynn by themselves and then circumnavigated in her. They later built a 29-foot version of the same type of heavy monohull cutter which they named Taleisin. The couple has rounded Cape Horn and made many ocean voyages on this boat as well, and they've written of their exploits in many books and countless magazine articles. Their experience gives them great credibility among all of us who sail and build boats. But the Pardeys interest in boats is focused on heavy, traditional wood construction using traditional methods that predate the development of materials like epoxy resins and fiberglass cloth. These methods are just as valid today as they were a century ago, but their validity does not change the fact that modern technology can also produce sound boatbuilding methods. The problems seem to arise when someone attempts to misuse a new technology, by combining it with an older method that was never intended to depend on such a modern adhesive. The Pardeys distrust of epoxy stems from seeing failures of it when applied improperly in this type of heavy, traditional wooden boat construction.

In this older method of boatbuilding, you're dealing with larger, heavier timbers that make up the hull components. These designs depend on precise carpentry joints reinforced with fasteners to keep them in place. More massive pieces of wood expand and contract to a greater degree when going through cycles of wet and dry and hot and cold. And the wood components of these traditional hulls are subject to this expansion and contraction because such hulls by design are not waterproof without caulking between the hull planks. It's the old basket vs. wooden bowl analogy, in that the basket (traditional wooden boat hull) depends on swelling to keep it watertight. Haul a planked wooden boat like this out of the water for an extended period of time and the planking will shrink, leaving gaps in the joints. In order to float, this type of hull depends on swelling of the wood and the individual parts must work independently; hence the need for fasteners that hold them in place during this cycling. Most any glue, including epoxy, will fail if used in an attempt to join large timbers subjected to this kind of cycling.

This is the reason modern wooden boats designed for epoxy construction are built in a completely different way. Scantlings and joinery methods are optimized for the use of epoxy as an adhesive if the designer understands the material. This is how the modern epoxy composite boat resembles the laminated wooden bowl, as opposed to the woven basket. The hull is made up of smaller parts that do not move independently, but instead are rigidly joined together to form a monocoque structure. In most designs using this type of construction, the hulls are further sealed and waterproofed by a laminated sheathing of fiberglass over the exterior. Water does not penetrate to the wood and there is no possibility of swelling due to water intrusion. The hull will be stable and stay the same whether the boat is in or out of the water.

So the bottom line is that if used as it is intended, epoxy as an adhesive and a laminating resin is without equal. The problem arises when someone tries to use it in a way that is less than optimum, such as in traditional boat construction, inviting failure and causing them to believe that the epoxy is at fault. If you want to build a modern wood-epoxy composite boat to a proven design, don't be discouraged by these naysayers. Epoxy is incredible stuff and I have absolute faith in it. Just look at the hundreds, if not thousands of boat designs that depend on it. Boats like Wharram's Tiki designs are engineered for epoxy construction and nothing else would work, nor could you build the boat as designed with any other type of glue. I have complete trust in the integrity of the Tiki 26 hulls I am putting together without metal fasteners of any type and I won't lose any sleep worrying about a glue failure when I'm on a passage days away from the nearest land.

If you want to read the arguments on both sides, the link to the forum debate about epoxy is here:

http://www.woodenboatvb.com/vbulletin/upload/showthread.php?t=71972

"Viking" Ship for Sale on Ebay

You just never know what you'll find for sale on EBay.... Anyone need a "Viking" Ship?


http://cgi.ebay.com/ebaymotors/Viking-Ship-Rare-and-Unique_W0QQitemZ230214373237QQcmdZViewItem?hash=item230214373237

Sunday, January 27, 2008

Boat Forums I Like

To me, some of the best entertainment reading on the Internet can be found in online forums. I also frequently peruse the forums on topics I'm interested in or want to know more about because of the wealth of knowledge usually posted in them by other enthusiasts of the same topic. Think of practically any subject you want to know more about, and you can probably find one or more active discussion forums online full of informative posts. When it comes to popular subjects like sailing, boatbuilding, or kayaking; there are many more forums out there than most of us have time to even find, much less read.

I thought I would share of few of my favorite boating forums with you here. These are the ones I read most frequently. Some I drop by most every day to see what's new, others less often, but all of these have been informative and interesting.

The Wooden Boat Forum Wooden Boat Magazine's forum for wooden boat enthusiasts. This is a very active forum with enough archived material to keep you reading indefinitely. Lots of good threads on boat designs, tools and techniques, and material choices. Most of the members lean to traditional wooden boatbuilding though, and there's a lot of epoxy bashing going on there from time to time. And don't dare mention fiberglass boats to these folks - to them this material is simply "frozen snot." The forum is divided up into these sub forums: Building/Repair, Designs/Plans, People/Places, Resources/Product Search, Misc. Boat Related, The Bilge.

The Sailnet Forums This is one of the most active sailing forums I know of. There's always something new here and lots of long and sometimes intense discussions from knowledgeable and not so knowledgeable sailors. I especially like some of the threads in the Buying a Boat forum, where everybody has got a different opinion as to what constitutes an "offshore" or "bluewater" sailboat. There's lots of bias towards monohulls and bigger boats, but some other points of view as well. Other sub forums at Sailnet I like are: Cruising, Gear and Maintenance, Living Aboard, Sailboat Design and Construction.

Sailfar.net This is a small and relatively new online forum, but full of good discussions by those who are generally interest in the kind of older, smaller sailboats John Vigor writes about in his Twenty Small Sailboats to take you Anywhere. These people on this forum are fixing up older boats and actually taking them cruising. See the sub forums, Routes and Destinations, Boat Discussion, and Sailing Stories.

Cruising World Forums This is another big forum connected with a magazine, Cruising World. Although much of the focus is on larger, more complex boats than I'm interested in, there are still some good threads, especially on destinations. Lots of these forum members are real cruisers and speak from experience. Check out Boats and Gear and Destinations.

Boat Design Forums These forums have some in-depth and technical discussions of boat design, some of them by naval architects or people in training to become one. I occasionally drop by the sub forums Multihulls and Sailboats. In any multihull discussion, Wharram catamarans are sure to come up from time to time, and these forums are no exception.

Living Aboard Forums Lots of discussion regarding boater's rights, legal issues, and boats suitable for living aboard, as well as how people finance their boating lifestyles. As a sailor who has lived aboard in the past, I find some interesting reading here.

Scott Brown's Multihull Forums Great stuff on multihulls with lots of emphasis on Wharram Catamarans and other homebuilt designs. This is probably the best forum resource online for those of us who are building Wharram catamarans. You have to change the settings to show all the older posts to find them, but there are literally hundreds of archived threads on Wharram cats. There are also sub forums on most other popular multihulls, so if more than one hull is your thing, this is your forum. The only downside is that the forum has had technical problems a lot recently and is often down.

The Wharram Forums Probably the most focused discussion of Wharram catamarans anywhere, this one is found on James Wharram's own website. Surprisingly, this forum is not as active as you would think it would be. There are lots of old threads with good info, but new posts only trickle in.

Boatbuilder Central (Bateau2.com) This forum is associated with Jacques Merten's designs and Boatbuilder Central online plans and boatbuilding supplies. Really good stuff on building techniques, as the designs are wood-epoxy composite. There are in depth technical discussions on epoxy use, fairing and fillers, fiberglassing, and priming and painting. You'll also find lots of active builders here posting updates on their projects.

Small Craft Advisor Message Board This one is associated with Small Craft Advisor magazine. The focus here is on small, trailerable sailboats, and the idea of cruising and voyaging in them. There's a lot here for those who like small simple boats.

Sea Kayaker Magazine Online Community Sea Kayaker magazine is the authority on serious sea kayaking. Here you'll find all the experts and the kayakers who are out there paddling all over the world. Lot's of good information here.

Messing About.com B&B Yachts Forum This is another good forum hosted by a designer, Graham Byrnes, of B&B Yachts. Most of his boats are not yachts, however. He is the designer of many small, simple cruisers and daysailors, like the Core Sound 17. On this forum you'll find many builders discussing their projects.

I'm sure I'm leaving out some, but these are the main forums that come to mind and the ones I visit most. In future posts I'll take a look at some specific threads I'd like to comment on and share with readers here. Oh, and if I'm missing some great boat forum you'd care to recommend, be sure and leave a comment here so I can check it out.

Friday, January 25, 2008

Boatsmith Taking Custom Orders

I've had some long conversations lately with David Halladay, of Boatsmith, about the feasibility of building custom wood-epoxy composite boats for customers. I spent several weeks working with him last year in Florida and he's been closely following my progress on my blog about my catamaran project Element II.

Now I've had the privilege to build a few small boats on a contract basis, like the 12-foot example of the Backwoods Drifter of my own design I am currently building for a fellow in Louisiana alongside my own Tiki 26. But I have not yet taken on a large cruising boat or yacht project from scratch. One reason is because I like to operate alone, and prefer to do jobs I can finish myself without the complications of finding hired help and keeping them paid. I could build a big boat for hire, but the customer would have to understand it would take me longer working alone.

David, on the other hand, likes to think big. He's used to contracting big projects and he has the shop space, the skilled crew, and the tools to make big jobs happen fast. He routinely fabricates and installs teaks decks for 100-foot motor yachts, and builds custom interiors for high-dollar sport fishermen and cruising yachts. I've been working with him from time to time since 2001, when I first sailed into the Palm Beach area of Florida and lived on my boat at Frenchman's Creek marina. David and I hit it off right away because of our love of boat work in general and our mutual interest in simple wood composite cruising vessels from designers like Reuel Parker and James Wharram. Arriving in a strange town after weeks of cruising, I needed work and David hired me right away when he found out I had built a Hitia 17 and knew a lot about Wharram designs. I didn't want to stay in south Florida permanently, for personal reasons, but I learned infinitely more about boat carpentry from him than I knew before, and brought that knowledge back to Mississippi to do business as Teaksmith on the coast. And I still go down and work with him occasionally when he has special projects.

David has been wanting to build a big Wharram catamaran for years, but he stays so busy working on other people's boats that it hasn't been practical for him to build the 51' Tehini he wants for himself just yet. So he's ready to switch gears and start taking orders to build these designs for others, who may not have the time or skills to build themselves, but can afford to have the boat they want built right, and to the highest standards. So if you've dreamed of a new Tiki 38 or 46, or perhaps a Pahi 42 , a Tangaroa, or a big Parker sharpie, Boatsmith can make it happen. He's got the space in his shop in Jupiter, Florida to build the biggest designs, and the warm climate and up to a dozen skilled carpenters available means you won't have to wait long to see your dream launched. If a smaller boat is more in line with your budget, David will do that too. Whatever vessel you prefer, he will build it to the designer's specs and for a fixed contract price.

David Halladay, of Boatsmith

You can see some examples of David's teak deck work and custom interior and exterior yacht carpentry on his own website here:
http://boatsmithfl.com/index.html


Get in touch and see what he can do for you. I'm looking forward to seeing the new boats that will come out of his shop, and if any of them are big Wharram cats I will do my best to get involved in the build as well. After all, I can be in Jupiter, FL from here in one long day's drive. At the very least I'll post progress reports here and keep you updated on the project.

Wednesday, January 23, 2008

Compact Hi-Intensity Flashlights

A new breed of flashlights for sea kayakers and other boaters in need of a powerful package compact enough to fit in the pocket of a PFD.


Expedition paddlers exploring unfamiliar coastlines are almost certain to eventually get into a situation that requires paddling at night. Despite careful pre-trip planning and studying charts to look for possible landing and camping sites, many factors such as weather, fatigue or accidents can cause delays that require navigating in darkness. This can even happen on a simple day trip, so all paddlers should be prepared for paddling at night. Some type of bright light is required safety equipment for alerting other boaters as well as for finding a hospitable shore. A powerful light is also especially useful for picking up reflective channel markers or the reflective tape on your partner’s PFD or kayak from a long distance.

When I first started taking long kayak trips almost 20 years ago, I carried a powerful underwater light designed for scuba diving at night. This light was a bulky affair—about five or six inches in diameter, like the 12-volt spotlights designed to plug into a cigarette lighter outlet in a car or boat—and powered by eight D-cell alkaline batteries. It was bright, though, and completely waterproof, and held up on two trips lasting several months.

The problem with the dive light was its size and shape. It was too big to go anywhere on deck and it was even an awkward fit in the cockpit. I normally kept it between the seat-back and the rear bulkhead while traveling, but that made it difficult to get to. It was expensive to purchase and expensive to run with less than two hours of burn time on a fresh set of the best alkaline batteries. The size and weight of all those D-cells limited me to carrying only one or two spare sets.

When this light finally died after years of hard use, I went through an assortment of cheaper, less durable alternatives powered by a single 6-volt lantern battery. None of the compact flashlights I carried for use around camp could compare to these bigger, more powerful spotlights that were so useful for scoping out a strange shoreline from a safe distance before landing.

A variety of high-power flashlights are now available in compact sizes. They are powered by 123A 3-volt lithium batteries, the same type used for many cameras and other high-drain electronic devices. Some of these lights are only slightly bigger than the popular compact flashlights that use two AA 1.5-volt alkaline batteries, but they are far more powerful. I recently tested two of these that are powered by three 123A cells and another pair that use just two cells.The three-cell lights are much more expensive and slightly larger than the two-cell lights but are powerful enough to replace the large bulky spotlights I used to use. The lithium batteries are only 1 <3/8> inches long (compared to 2 inches for a AA battery), so even the three-cell lights are small enough to carry any time you go paddling. They provide a bright, broad beam of light that is useful to a kayaker looking along the shore for a place to land.

All of these lights use Xenon lamps. Xenon is an inert gas that fills the lamp bulb to allow the filament to burn hotter and brighter without burning out. They all produce a clear, consistent beam without the usual varying rings of light typical of standard flashlight beams. To test the lights, I took them for a night paddle along a heavily wooded, swampy lakeshore.

SureFire M3 Millenium Tactical Combatlight

The M3 Combat Light is the largest and by far the most expensive of the four flashlights I tested. At $252, it’s billed as a “heavy-duty tactical flashlight to meet the needs of demanding customers such as military special operations units, SWAT teams and other law enforcement professionals.” The case is anodized aircraft aluminum with a checkered grip especially designed for the Rogers/SureFire combat grip—a technique used by the aforementioned customers when engaging opponents in the dark with a handgun. Sea kayakers won’t need that particular design feature, but the no-compromise quality built into this rugged light makes it a good choice for the demands of an expedition.

Although not rated for underwater use, such as diving, SureFire claims that all its current lights are waterproof to about 33 feet. I left it under about three feet of water overnight and found no moisture had entered the case. The switch is built into the tailpiece—turning it full clockwise turns the light on—but the tailpiece also functions as a momentary push-button switch when partially rotated. Backing the tailpiece off by turning it counter-clockwise disables the push-button feature so the light can’t be accidentally activated when packed.

The M3 comes with a 225-lumen lamp and a 125-lumen lamp. On a set of three batteries, the 225-lumen lamp provides only 20 minutes of run-time, and a 125-lumen lamp runs one hour. With the high-output lamp installed, the M3 is by far the most powerful of the four lights I tested.

This light provides a useful range of at least 200 feet, completely illuminating the dark woods of the lakeshore I paddled along from that distance. The beam it throws is perhaps not as broad as my old diving spotlight, but it is amazingly intense for such a small package. I even took it out for a drive on a deserted country road and found it bright enough to drive by, held out the window of the car with the headlights turned off. Reflective road signs were visible over a half a mile away.

At just over seven inches long and with a bezel diameter of 1.62 inches, the M3 may not fit in small PFD pockets, but it’s still compact enough to carry in a chart case or perhaps secured with a Velcro loop to your PFD. A lanyard is included with the light. With the high-power lamp, it will burn through 123A batteries in a hurry, but for such power that’s a reasonable trade off. SureFire sells its own brand of lithium batteries in a case of 12 for $21. These batteries are so small and lightweight, a kayaker could carry several cases on a long expedition.

SureFire M3 Millenium Tactical Combatlight
SureFire
800-828-8809 or 714-545-9444
helpyou@surefire.com
www.surefire.com

Pila GL3

The other three-cell 123A flashlight I tested was the Pila GL3 from Permalight. A bit more compact than the SureFire M3, the Chinese-made Pila GL3 measures just over six inches in length and has a bezel diameter of 1.3 inches. Like the M3, the case is also anodized aircraft aluminum, but inspection of the threads inside the screw-on bezel and tailpiece revealed some rough surfaces and possible damage that might interfere with removal and replacement over time. This light did leak inside the bezel during an overnight immersion test, but it is only rated as splash proof. Despite the water intrusion, the light continued to function perfectly while wet and after disassembly and drying.

The biggest difference between the Pila GL3 and the SureFire M3 is the addition of a red four-LED light built into the tailpiece. Like the M3, the on-off switch for the light is a rotating tailpiece that also functions as a momentary push-button switch. The distinction is that the red LED light comes on first as you begin to turn the tailpiece clockwise. Turn it a bit further, and you can use the push-button to turn on the main lamp. Turning it fully clockwise turns off the red LED light and turns the main lamp full on.

I like this red LED feature a lot. It’s handy to have both a high-power spotlight and a red lamp for reading charts without ruining night vision all in the same compact package. The red LED light is plenty adequate for following a trail through the dark woods at night or for chart work or other tasks in the cockpit such as searching through a dry bag for a snack, and the current draw in this mode is so low that it will burn up to 60 hours in continuous operation. The Pila GL3 will also operate on two included lithium-ion rechargeable batteries that can be recharged in just three hours. (These batteries weren’t available during my testing.) This is a nice alternative to the 123A batteries if you’re just using the light for short trips or the occasional night paddle.

The white Xenon lamp in the GL3 has an output of 130 lumens, comparable to the lower-powered lamp provided with the SureFire M3. The GL3 will run for a continuous 50 minutes on three 123A batteries using this lamp. In a run-time and output test, I found the M3 (with the 125-lumen lamp) and the GL3 to be about equal.

The Pila GL3, being a bit shorter and slimmer, is somewhat easier to stow in a pocket than the SureFire M3, yet still produces comparable output. The red LED is a nice addition, and although it is not as nicely machined as the M3, at about $85, the price is a lot easier on the expedition budget. The model I tested has now apparently been changed, with a redesigned case and a 200-lumen Xenon lamp. The upgraded model is available with a variety of LED tailpiece and switch options.

Pila GL3-Xenon
Permalight (Asia) Co., Ltd.
937-644-2170
info@pila-usa.com
www.pila-usa.com

Two-Cell 123A Flashlights

I also tested two smaller lithium-powered flashlights that are in a different class from the three-cell lights. The SureFire G2 Nitrolon and the Brinkmann Maxfire LX both operate on just two 123A cells, using Xenon bulbs like the more powerful lights. While not as useful as a spotlight for examining a distant shore, the two-cell units are plenty adequate to meet the safety requirements of a bright light to signal other vessels, providing more output than a four D-cell flashlight in a package small enough to easily fit in a PFD pocket or chart case. Both of these lights remained dry in the same immersion test I used for the larger lights.

The SureFire G2 sells for $36 and has a 65-lumen lamp that runs for 60 minutes. There’s an optional 120-lumen lamp available that provides 20 minutes of run-time. The tough polymer case is 4.9 inches long, and the switch works the same as the M3, with a rotating tailpiece that also features push-button momentary on.

The Brinkmann Maxfire LX comes in a rubberized polymer case 5.5 inches long. The output power of the Xenon bulb is not given in the information packaged with the Maxfire, but in my tests, it seemed equal in every way to the SureFire G2, including run-time. One key difference is the lack of the rotating tailpiece switch found on all the other lights tested.

The Maxfire uses a simple push-button switch in the tailpiece, working as a momentary on switch when lightly depressed and full on after pushing hard enough to click. I like this switch better than the rotating ones because it’s easy to activate with one hand from any position. This high-powered flashlight is also a bargain compared to the others tested, available at discount department stores for about $16 to $20. It comes with two Sanyo 123A batteries in the package.

SureFire G2 Nitrolon Xenon Tactical Flashlight
SureFire
800-828-8809 or 714-545-9444
helpyou@surefire.com
www.surefire.com

Brinkmann Maxfire LX Lithium Xenon Flashlight
800-527-0717 or 972-716-4262
customerservice@brinkmann.net
www.brinkmann.net

Small but Mighty

Having tested this new breed of compact, high-power flashlights, I can’t imagine being without one in the future—not only for sea kayaking, but as a great emergency light to carry in a vehicle or to use while sailing, hiking or any other outdoor activity. All the lights tested are better than anything I’ve used in the past. I’ll definitely pick up a Maxfire or G2 for all-around general use and probably one of the powerful three-cell units like the M3 Combat light for nighttime navigation. It’s also worth noting that if you don’t mind spending even more money and carrying a slightly bigger flashlight, SureFire and other companies offer tactical lights that use four and even six 123A cells, claimed to be powerful enough to function as handheld searchlights.

This article by Scott B. Williams was first published in Sea Kayaker magazine, October 2006

Monday, January 21, 2008

Origo 3000 Alcohol Stove


The stove I ordered for the minimal galley on my Tiki 26, Element II arrived Saturday. It is an Origo 3000, the ubiquitous non-pressurized alcohol boat stove made in Sweden and found on so many boats around Europe and North America. Marine alcohol stoves are criticized by many, and propane seems to be the fuel of choice for most modern cruising boats, but my reasons for choosing this type of stove are obvious when the focus of the boat and it’s intended use is taken into consideration.

First of all, there is simplicity. Simple, yet functional and efficient are the guiding themes of the Tiki 26 design in the first place, and something I want to adhere to in all systems and installations as much as possible. Sure, it would be even simpler to take a portable one-burner camp stove like I used on my sea kayaking trips and on my smaller Wharram cats, the Hitia 17 and the Tiki 21. But Element II will be going to sea, not just sailing from anchor to anchor in the course of a day. There will be a need to cook simple meals and make a pot of coffee or a cup of tea while underway, and this requires a dedicated stove mounted in a secure location out of the weather. The Origo 3000 is compact for a 2-burner stove and optional pot holders and gimbals are made for it that allow cooking in most any conditions. Camping stoves are fine at anchor, but I don’t want a stove with disposable propane bottles down below when it’s rough out. I’ve had too many leaks from these canisters in the past to trust them, and besides, all the camp type stoves I’ve used in the past quickly began to rust when used in the marine environment. The Origo 1500 one-burner stove I had on my Grampian 26 Intensity, however, is now 7 years old and still in great shape, thanks to the quality of the stainless steel used in its construction.

The great advantage of the Origo non-pressurized alcohol stoves is that they don’t use moving parts, or depend on secure seals or pressure pumps that have to be rebuilt often with everyday use. These stoves are as simple as it gets. Just keep the tanks filled with alcohol, open the burner valve when you’re ready to cook, and strike a match. It doesn’t get any simpler or more reliable than that. I especially like the fact that the stove is totally self-contained. No need for complex tank installations outside the cabin with hoses to the stove, as in propane, and no external parts or systems to worry about. If there is alcohol in the tank, the burner simply works, without fail. Another advantage of a self-contained stove like this is that just like the camp stoves; the Origo 3000 can be easily moved out into the cockpit or even taken ashore for cooking when the boat is not underway. I will probably do a lot of cooking in the cockpit under an awning or in a deck tent when I’m anchored someplace I want to stay awhile.

Cost is another factor in this choice. While the Origo stoves are more expensive than most camping stoves, they are still much less expensive than marine propane stoves and all the associated paraphernalia necessary for a safe installation. A two-burner model like the Origo 3000 falls somewhere in the middle of the price spectrum between the other two options. I got mine brand new from an EBay seller for about half the manufacturer’s retail price.

Safety is a topic much argued about among proponents of different types of marine stoves. I won’t get into this discussion, other than to say that cooking with any kind of stove on a boat requires common sense and a degree of caution. Propane can blow your boat and you with it to pieces. Spilled alcohol burns with an invisible flame and can spread before you know it is happening. James Wharram himself has stated that fire at sea is his biggest fear. It really is the one thing you have worry about most when your boat is as seaworthy as a Wharram. I’ll just say that I like alcohol because quantities of it can be safely carried in sealed containers down below, without the risk of explosion, and I don’t worry about it when the boat’s in a marina and I’m away from it for awhile.

Two other factors concerning alcohol are cost and cooking time, and these are both things I can’t do anything about, so I don’t worry about them. Denatured alcohol is ridiculously expensive, but if you shop around you can find large variations in price. The main thing is to stay away from places like West Marine, where it’s about double what I pay for it at a professional painter’s supply store. When factored into the overall picture, the cost of alcohol does not bother me, because I’m cruising on a simple boat that saves money in so many other ways, such as rarely needing to burn fuel for propulsion, and being able to avoid marinas by having so many anchoring and beaching opportunities due to shallow draft. I can set out with three or four gallons of alcohol and do all the cooking I want for many weeks.

And why should it matter if it takes a few extra minutes to cook a pot of rice or make a pot of coffee? When I’m on Element II I’ll be where I want to be and time isn’t going to matter. Using the Origo 1500 on Intensity I never seemed to notice that it took any longer to cook than on any other stove. Besides, while dinner’s on I’m usually busy doing something else anyway, like steering the boat or studying a chart.

Sunday, January 20, 2008

Paddling the Arctic Tern Kayak

The 17-foot Arctic Tern kayak by Pygmy Boats is a fun project for boatbuilders, many of whom enjoy the building more than the actual use of the boat. But it is when the sawdust has settled and the last coat of varnish is dry that this homebuilt wooden kayak comes into its own.

Having paddled thousands of sea and river miles in production sea kayaks, mainly my trusty Necky Tesla 17, I approach any new kayak that I intend to trust my life to with some degree of skepticism. But the Arctic Tern inspires confidence from the start. Her hard chine hull offers excellent initial stability, and when you lean over to put the edge in the water you feel the solid secondary stability kick in. To make a quick turn, just lean to the opposite side and she will pivot quickly with a sweep stroke.

This kayak requires no rudder, another concept I was skeptical about at first, having come to depend on a rudder for tracking in strong cross winds and beam seas. The Arctic Tern tracks fine without one, though, in all the conditions I tested mine in, including headwinds, tailwinds, and cross winds. This boat is ideal for beginners as well, and I have used it to introduce several beginners to their first experience in a sea kayak. Without exception, all of them could keep up with me in my Necky, and had no trouble holding a straight course. The extreme light weight of this boat is another aspect beginners appreciate, as they can paddle for hours without undue fatigue.

I've used the Arctic Tern for countless day trips and short paddling excursions, but usually rely on my larger-volume Necky Tesla for expedition paddling. But when it came time to paddle the length of the Pascagoula River System to gather material for the book Paddling the Pascagoula, which I co-authored with Ernest Herndon, the Arctic Tern seemed a natural choice. For this two-week journey from the headwaters of the Chickasawhay River to the Gulf of Mexico at the mouth of the Pascagoula River, I anticipated that the lack of a rudder and the quick maneuverability of the hard-chined hull would be much appreciated. This proved especially true on the twisting, deadfall-choked upper reaches of the Chickasawhay, and the easy speed and superior tracking made the broad, windswept reaches of the lower Pascagoula a pleasure. I am pleased to say that I was not disappointed in my choice of boat for the trip. The Arctic Tern performed wonderfully and carried me and my gear safely and quickly down those 240 serpentine miles. The only disadvantage was that the gear had to be chosen carefully, as this boat has a much lower volume than I am used to in my larger kayak.

The Arctic Tern has consistantly received good reviews in the kayaking community. That's saying a lot, because the people that are serious about their paddling are not easily swayed by the romance of varnished mahogany that makes amatuer boatbuilders drool. Many of the wooden kayak designs out there are hardly fit for a paddle in the lake, much less the ocean, but in designing the Arctic Tern, John Lockwood created a real winner in both the looks and performance departments. I can say that I heartily endorse this kayak, and would not hesitate to recommend it.

Here is an excerpt from a review of the Arctic Tern published in Sea Kayaker magazine, December 1999:

"I really loved this kayak. The hull design is top notch, it combines superb rough-water handling, good tracking and turning, and outstanding surfing ability for a touring kayak. The boat has a silky feel in rough water, and it was very comfortable when I was caught in a big cross chop - a superb rough-water kayak. A great choice for beginners interested in learning good technique and edge control." KW

(This article was first published in the Scott's Boat Page newsletter, May 2004)

Saturday, January 19, 2008

Building the Arctic Tern Sea Kayak


The Arctic Tern Sea Kayak Specs: (standard 17' model)

LOA - 17'

Beam - 23"

Depth - 12"

Weight - 39lbs.

When I set out on the upper Chickasawhay River near Enterprise, Mississippi to paddle 240 miles to the Gulf of Mexico, my boat of choice was the versatile and extremely lightweight Arctic Tern sea kayak, designed by John Lockwood, of Pygmy Boats. Pygmy Boats offers by far the most sophisticated designs for wooden sea kayaks. These boats are built of Ocoume mahogany plywood, in the stitch and glue method with an outer laminate of 6-oz fiberglass, producing a lightweight boat with the beauty of bright-finished wood and the strength of fiberglass.

The 17-foot Arctic Tern design weighs only 39-lbs., and paddles like a dream with no rudder required. This boat is as seaworthy as any factory-produced sea kayak, with watertight bulkheads and hatches fore and aft and a standard-sized cockpit coaming for fitting a sprayskirt. These boats are only available as kits that include the precut wood panels for the hull and deck. Plans are not sold separately, except for some of the older designs. The kit prices are reasonable though, and most builders would not be able to obtain the materials separately for the same cost. Construction is straightforward, but time consuming if done to high standards.

I currently own an Arctic Tern 17 that I built on commission for my nephew, Brian Nobles, of Brandon. He used the boat a few years and sold it back to me when he transferred out of state. I had already built another Pygmy design, the Coho, for my own use, so I was familiar with their kits and construction method. The boat went together fairly easily, but as in any fine wooden boat building, it can not be built in a hurry if you expect a showroom finish. When I built these two kayaks I was already an experienced boatbuilder with both woodstrip and stitch and glue boats to my credit. Building from a kit does eliminate a lot of tedious lofting and cutting out of panels, but the assembly, epoxy fillets, and fiberglass work are always the more time consuming parts of plywood boatbuilding.


(This article was first published in the Scotts Boat Page newsletter, April 2004)

Gear and Supplies for Two Weeks on a Southern River


Gear and Food Supplies for 2 weeks of Deep South river paddling:


(Note: This article was written in 2004 when I was in preparation for the trip described in my book, Paddling The Pascagoula. The boat I used for the two-week journey was the 17-foot Pygmy Arctic Tern, a stitch and glue kayak I built from a kit.)


People unfamiliar with small boat travel often ask me how I carry enough food and supplies in a boat as small as my kayak. Though it might seem improbable, here is my checklist of stuff that has to go into and on the deck of my 17-foot long by 23-inch wide kayak:


Kayak Gear:


Two-piece ultralight wood paddle --2-piece composite spare paddle -- neoprene spray skirt-- PFD-- paddle float rescue device-- bilge pump-- bailing sponge-- deck-mounted compass-- rescue knife-- dry bags-- deck-mounted chart/map case-- bungie cords on deck


Navigation, photography, and communication:


Garmin E-trex GPS receiver-- Suunto hand-bearing compass-- Fujinon waterproof 7 x 35 binoculars with internal bearing compass-- 1:12,000 scale topographic maps and matching aerial photographs for entire river course--watch-- Nikon N-65 SLR camera with 35-90 mm zoom and 70-300 mm zoom lenses-- 8 rolls color print film--4 rolls color slide film-- tripod-- Kodak CX6330 Digital Camera with 256MB SD card-- approximately 36 AA Duracell batteries for GPS and digital camera-- cell phone--12-volt DC charger cord and 1.8 watt compact solar-charging panel for the phone


(Update: I don't carry a film camera anymore. The Nikon N-65 has been replaced with a Nikon D 50 digital SLR, using the same lenses I used on the N-65. Film, of course, is now replaced with severl 512MB and 1GB SD cards. The Kodak point and shoot camera is still carried for capturing video clips.)


Camping Gear


Eureka Timberline tent-- plastic ground sheet-- 6 x 8 tarp-- tent stakes-- cordage-- sleeping bag-- Thermarest pad-- Crazy Creek folding chair-- army hammock-- inflatable pillow-- Primus propane stove-- 3 bottles of propane-- skillet-- cookpot-- utensils-- teapot-- coffee strainer-- cup-- Polar Pure water purification system-- Nalgene water bottles-- Bic lighters-- machete-- two AA mini-maglights-- one D-cell maglight


Clothing and Misc. accessories


Colombia rain jacket-- hiking boots-- river shoes-- river sandals-- T-shirts-- long sleeve canvas shirt-- 2-pair military BDU pants-- 2-pair cargo shorts-- swim shorts-- wool socks-- wide-brim hat-- sunscreen-- sunglasses w retainer cord-- spare sunglasses-- trash bags-- toothbrush-- toilet paper-- shampoo-- small towel-- mirror-- razors-- vitamins-- snakebite kit (Extractor)-- Epipen shot (for wasp stings)-- Tylenol-- misc. First-Aid supplies-- field guide to trees-- field guide to edible plants-- journal-- pens-- pencils-- Gerber multi-tool-- duct tape --firearm and ammo (Usually a .45 auto pistol, or my folding Kel-tec 9mm carbine. Sometimes a .22 rifle if it's small game hunting season)


Food and Drink


Pancake mix-- maple syrup-- oatmeal-- granola cereal-- powdered milk-- walnuts-- almonds-- raisins-- dried fruit-- cooking oil-- olives-- M&M's-- honey--Wheat Thin crackers (2 bx)-- Triscuit crackers (2) box-- sardines in mustard sauce (14 cans)-- tuna in water (10 cans)-- Lipton rice meals (7 packs)-- Lipton pasta meals (7 packs)-- chile with beans (2 cans)-- chunky soup (2 cans)-- black beans (2 cans)-- fruit and cereal bars (14)--powdered Gatorade-- powdered Koolaid-- cheese (3 blocks) swiss and cheddar-- Tabasco sauce-- Tony Chacere's Creole seasoning-- hot chocolate (10 packs)-- various types of herbal tea bags-- Captain Morgan spiced rum (1 bottle)--a few good cigars


Yes, this does all fit into the storage compartments and cockpit of the kayak. The trick is to package everything into small dry bags and 1-gallon Ziploc freezer bags so that every available cubic inch of space is utilized. Weight is seldom an issue in sea kayaks. I've found that if the stuff will fit in the available volume, it will float.


This article was first published in the Scott's Boat Page newsletter, April 2004

Friday, January 18, 2008

Wharram Child of the Sea "Manurere"


(photos courtesy of Bill Barker, who attended the launching)

One of James Wharram's newer catamaran designs, the ethnic "double canoe" he calls Tama Moana, or "Child of the Sea" was launched recently near Santa Barbara, California. Here's Wharram's description of the design:

The Child of the Sea has the traditional hullshape of the islands of Tikopia and Anuta. She is built in strip planking over plywood backbone and bulkheads. She is steered with side rudders. Ethnic Designs as Canoe Craft have a basic design principle of maximum boat for minimum cost, and at the same time be a research participant in a major attempt to recover and preserve the practical, design, handling aspects of Man's first offshore sailing vessels.

Length Overall:
37' 9"
11.5 m
Beam Overall:
14' 11 "
4.55 m
Weight:
3.525 ton
1600kg

Glenn Tieman, the builder is a long-time Wharram catamaran enthusiast and experienced sailor. His first Wharram catamaran was the Pahi 26 design, which he built himself and sailed all over the south Pacific, living aboard it for 10 years. Glenn is definately a minimalist who appreciates the simplicity and function of Wharram's designs, so the Tama Moana design with its traditional crab claw rig and spartan accomodations is right in line with his needs as an adventurous sailor who will soon set off to return to the Pacific islands on his new boat. He has christened his vessel "Manurere," Maori for "Bird on the Wing."

Glenn is to be commended for building such a fine example of the Tama Moana, and for having the courage to sail in a simple, yet seaworthy craft that is so far outside the mainstream of modern yachting. I wish him fair winds, following seas, and beautiful anchorages among the lonely atolls of Oceania.

Here's some more background info about the Tama Moana project from James Wharram's site:

http://www.wharram.com/lettermarch06.htm

(This article was first published on Island Time Online, 10-18-2006)

Thursday, January 17, 2008

Twenty Small Sailboats to Take You Anywhere

Cruising Boats Anyone Can Afford to Own

A lot of newcomers to the world of sailing and especially cruising and voyaging are unfortunately put off by the notion that sailing is prohibitively expensive and out of reach of all but the wealthy. This misconception is perpetuated by the glossy full-color advertisements in the sailing magazines for yachts costing anywhere from $100,000 on up to well over a million. The trend, in fact, in the yacht manufacturing business has in recent years favored boats in the 42 to 55 foot range, with an average price tag of around $350,000. Who buys boats like that, and who really needs that much boat? Do you have to have a boat that size to go cruising?

Of course not. Even families can get by with much smaller boats, and cruising couples and singlehanders can do with a whole lot less. In my travels throughout the Caribbean, I met lots of folks out there cruising on boats in the 30 to 35 foot range, and quite a few on boats as small as 20 to 25 feet. 26 to 27 footers are commonly making voyages all over the world. The real sailing literature (not the advertising-driven rags) is full of the accounts of voyagers who have circumnavigated and sailed to the ends of the earth on boats in this size range.

In future posts here I will include reviews of some of the books written by these sailors, but in this article I want to bring to your attention a book by sailing author, John Vigor, entitled: Twenty Small Sailboats to Take You Anywhere. All of the boats profiled in this informative little book fall into the size range of 20 to 32 feet, and all have been in production long enough that used examples in various states of neglect are out there waiting to be bought by sailors on a budget. Here are just 10 of the boats included in the book that meet John's criteria for capable small cruisers that can go anywhere - he qualifies this by listing strengths and weaknesses of each boat, and suggestions for modifications that might enhance seaworthieness and safety:

Pearson Triton 28

Albin Vega 27

Cal 20

Contessa 26

Westsail 32

Cape Dory 25D

Catalina 27

25' Folkboat

Alberg 30

Bristol 27

All of these boats can be found on the used boat market at a price that won't put you in debt for the rest of your life. And, of course, besides the 20 boats profiled in the book, there are many others out there that also meet the criteria for seaworthiness and affordability. The Grampian 26, Intensity, that I used to own is another good example. But for anyone not knowing where to start in their search for a suitable cruising boat, John Vigor's book offers some of the best advice available. You can read the editorial reviews and the many reader reviews of the book on Amazon. Check it out and see if you don't agree, and may you keep that cruising dream alive and not be discouraged by the price of new boats that you don't need.

(This article was first published in the Scott's Boat Page newsletter, 2004)


Monday, January 14, 2008

Sailing the Gulf Islands National Seashore

Here are a few images from my sailing trip on Element last weekend. I left Biloxi and first sailed to East Ship Island, where I anchored for the first night. The next day I sailed over to West Ship Island and went ashore to visit a friend who is one of the captains of the Ship Island Excursion boats. West Ship is the only island in the Gulf Islands National Seashore with regular excursion boat service, and as a consequence it is usually crowded with sunbathers and beachgoers this time of year. I didn't stay long before pulling up the anchor and sailing to Horn Island, where I spent the next two nights sleeping aboard at anchor. Horn Island is the centerpiece of the Gulf Islands National Seashore. It is a designated wilderness area, over 12 miles long and approximately 1 mile wide in most parts. It is superb wildlife habitat with forests, marshes, interior lagoons, dunes and beaches, and is home to such creatures as alligators, raccoons, otters, rabbits, ospreys and many species of wading birds. The photo below is from the north shore of the island, about half way between the east and west ends.

Horn Island offers miles of usually deserted white sand beaches and pine forests

Marshes like this are found throughout the interior of the island, making it difficult to hike across the island except in a few places.

Here's a shot of the "galley" on Element, a two-burner propane stove on deck. This worked great even in the 15-20 knot winds I experienced the first night anchored out, due to the windscreen formed by the stove's lid. Dishes were easily done in a bucket of seawater, followed by a fresh water rinse. Stainless steel cookware is the way to go.

Every night of the trip I had perfect sunsets like this. I anchored far enough out to avoid the mosquitoes that are thick at night on the beaches, so at night I burned a white L.E.D. anchor light just in case any powerboaters cruised through the area. This portable L.E.D. light was great. I burned it all night for three nights without having to replace the AA batteries. When I get to the point of outfitting Element II for cruising, all navigation and interior lighting will be L.E.D.


The water can be quite clear around the barrier islands, such a contrast to the murky waters off the mainland coast in Mississippi. This photo was taken just off the beach at East Ship Island. The next day while sailing across the same area of shallows on the way to Horn Island, I saw a large shark, approximately 10 feet long cross my path just ahead of my bows.

Element anchored off Horn Island.


This article was first published on Element: A Wharram Tiki 21 Catamaran on 5-24-2006

The Wharram Tiki 21 Catamaran


I decided to go back to a simpler kind of sailing for 2006 after loosing Intensity, my Grampian 26 monohull cruiser to Hurricane Katrina in 2005. I've long been fascinated with James Wharram catamarans and built one of his smallest designs the Hitia 17 beachcruiser, back in 1997-98. (See a photo and description here) I had originally planned to build one of his Tiki 26 or Tiki 30 cruising catamarans, but instead bought the Grampian 26 and put most of my time and energy for a few years into refitting and cruising on it. The disadvantages of a deep-draft keel boat have long been apparent to me, and the lack of truly safe harbors on the Mississippi coast when a hurricane threatens is definitely one of those disadvantages.

Most multihulls are shallow draft, and Wharram catamarans are designed to really take advantage of this feature, with hull forms that require no underwater appendages such as centerboards or daggerboards to enable them to sail to weather. They can dry out on a falling tide and even the bigger ones can be sailed right up to the beach. Although I have the building plans for the Tiki 26 and have long thought this was one of the most practical sizes for my needs, shortly after Katrina wrecked the Gulf coast I purchased a used Tiki 21 from a couple in Ocean Springs. The price was right and the catamaran came with a galvanized trailer. Trailerability was especially important to me with most of the marinas on the coast wiped out. I could bring the boat inland for a complete refit and take it back to the coast after some of the clean-up and rebuilding was done.

The Tiki 21 is an excellent beachcruiser style of boat. While too small to live aboard in the conventional manner, it does have a dry sea berth in each hull to make longer passages possible, and the expansive bridgedeck between the hulls makes a great platform to pitch a tent once the boat is anchored for the night. Although small, the Tiki 21 is a proven offshore passagemaker. It was designed as a coastal cruiser by James Wharram in the early 1980s and was never intended for long ocean passages. Despite this, a young man named Rory McDougall built one in Devon, England and left in 1991 bound for New Zealand. He eventually sailed on around the world, making the Tiki 21 the smallest catamaran in history to circumnavigate. He returned from the voyage enthusiastic about the boat, and continued to use it for shorter trips, with no desire to acquire a larger one.

It takes a different sort of mentality to voyage that far on such a small, mostly open boat, but Rory's completion of the trip shows what is possible. As he said, his boat would be considered luxurious by the standards of the ancient Polynesian voyagers whose craft were Wharram's design inspiration. Having traveled far in much smaller boats (namely canoes and sea kayaks), I'm familiar with the concept of simplicity and the advantages of carrying less and using less in the way of complex systems. The Hitia 17 that I built years ago was at the time my idea of a perfect small cruiser, but it's primary limitation was that there was no secure place anywhere on board to sleep while underway or to get out of the weather if caught out in bad conditions. It's also a bit limited in load carrying capacity for longer trips, where as the Tiki 21, with a capacity of 1,000 pounds, should have a good range for singlehanding, with room for everything one needs for this elemental form of cruising.

It seems to me that this boat, with its shallow draft of just 14 inches, stability and seaworthieness of it's deeply flared V-hulls with an overall beam of 12' and it's cruising speed of up to 10-12 knots in the right conditions, will be ideal for exploring the islands and estuaries of the Gulf coast. I can also envision cruising it among the far-flung mangrove cays of the Florida Keys and the Everglades, having a comfortable camping platform for overnight stops away from the mosquitoes and no-see-ums of the beach. A voyage across the Gulf Stream to cruise the Bahamas is certainly within its capacity for one willing to put up with a little discomfort, and such a trip is one of my goals for this boat. Wharram catamarans are being built and sailed throughout the world, and many resources are avaiblable on the Internet for those interested in these boats. The best place to start is at the source itself: www.wharram.com for information on all the designs available. As I complete the refit and modifications of my Tiki 21, I plan to post photos and commentary here for all who are interested.

This article was first published on Element: A Wharram Tiki 21 Catamaran on 3-1-2006

Sunday, January 13, 2008

Camping On Mississippi's Barrier Islands


Mississippi’s barrier islands offer a unique wilderness camping experience for those who want to get away from the mainland and try an island lifestyle, if only for a weekend. Can you imagine walking miles of beaches in the light of a full moon without a road, casino, or house in sight? How about waking up on an empty expanse of white sand, with nothing but Gulf of Mexico at your front door and miles of forest and marsh to explore in the interior? These experiences and more can be found on the barrier islands that lie just over the horizon across the Mississippi Sound. Camping comfortably on these barrier islands, however, requires some special techniques and equipment to deal with changing conditions encountered there. Scorching sun, relentless winds, and fierce insect hordes can all conspire to make these islands seem anything but paradise to those who are not prepared.

These considerations make the tent the most important item on the camper’s checklist. It pays to invest in a good tent. Cheap dome tents with fiberglass poles do not fare well in heavy rain squalls and the strong winds that sweep unimpeded across the exposed beaches of the barrier islands. Better tents have lightweight but strong aluminum poles, and a separate rain fly that attaches over the main tent. I favor the A-frame designs over domes. These allow you to open the doors at least part way for ventilation on hot but rainy nights. Good tents also feature finer mesh in the screens of windows and doors. This is an absolute necessity on the islands, where tiny biting gnats called “no-see-ums” can attack in such numbers that the unprepared will be driven off the island. This happened to me on one of my first trips many years ago in a cheap dome tent with standard mosquito netting. In addition to the tent, you will need plenty of good stakes to secure it against high winds in the deep and shifting sands that make up these island beaches. The best tent stakes for sand are the plastic ones that are T-shaped in cross-section and at least an inch wide for holding power. Use stakes that are a foot long or more, and drive them deeply with a mallet or piece of driftwood. I also like to carry a light tarp in addition to a tent to set up as an awning for cooking in rainy weather or for shade on a hot day. This will require extra tent stakes, line, and some sort of pole or piece of driftwood for setting up, but it is well worth carrying.

Island cooking can be done with a fire, but be aware that fires are permitted in the Gulf Islands National Seashore only in the sand below the high tide line. A better option is a portable camp stove. The ones that use disposable propane bottles are the most efficient and reliable. Cookware should be of stainless steel, and can be scrubbed clean with beach sand as long as it is not Teflon-coated.

Fresh water is a precious commodity on the barrier islands. Carry as much as you can, and more than you think you’ll need, for drinking, cooking, and washing; and be sure it is in leak-proof containers so it is not spilled and wasted. If you go wilderness camping on Mississippi’s barrier islands, you need to plan to be self-sufficient. Carry everything you think you’ll need, and take everything you carry back home with you. Many people don’t realize they can travel light, camp in remote places, and still be comfortable. To me, part of the pleasure in wilderness travel is feeling at home wherever I may stop for the night. And feeling at home means being sheltered, well-fed, and comfortable. I am including here an abbreviated gear checklist for island camping, as well as rules and regulations for camping in the Gulf Islands National Seashore. More specifics on gear, techniques, and where to go can be found in my book: Exploring Coastal Mississippi: A Guide to the Marine Waters and Islands, University Press of Mississippi, 2004. In future articles here I plan to discuss sea kayaking equipment and techniques, look at other boat types suitable for camp cruising, and for those who do not have their own boats, profile various outfitters and charter operators who can provide transportation to the islands.

Island Camping Checklist: (The Basic Essentials)

Tent with “no-see-um” netting, strong poles Extra tarp or rain fly

Tent stakes that work in sand, mallet and extra line for tie-downs

Self-inflating sleeping pad or air mattress

Sleeping bag

Camp stove and fuel

Stove lighters or matches

Stainless steel cookware (skillet, coffee pot, cook pot, etc.)

Stainless or plastic utensils, cups, bowls, plates

Compact can opener

Trash bags

Biodegradable liquid soap

Cooking and drinking water in leak proof containers

Waterproof flashlight (with spare bulbs, batteries)

Insect repellent

Sunscreen

Rain jacket and pants, or poncho

Hiking boots or shoes

Long sleeve shirt and pants (even in hot weather- for insect protection when needed)

Swimwear

Hat for sun protection

Basic first aid supplies, snakebite kit,

Benadryl (for stings)

Toothbrush, toilet paper, etc.

Sunglasses

Camera, binoculars, notebook (optional)

Hammock and good book (optional)

Camping in the Gulf Islands National Seashore

Beach camping is permitted on Petit Bois, Horn, East Ship Island, and the parts of Cat Island that are included in the Gulf Islands National Seashore. Camping is not permitted anywhere on West Ship Island.

Permits are not required for camping on the islands, but certain areas may be closed by the rangers at various time to protect nesting birds and other plant and animal species.

Fires are permitted only below the high tide line where waves will carry the debris away. Driftwood is abundant, so cutting firewood is not permitted.

Glass bottles or containers of any kind are prohibited on all the islands, as are firearms.

Campers should come prepared, with all food, water, fuel, etc. they will need for the duration of their stay. It is not the job of the park rangers to supply these essentials to the ill-prepared.


(This article was first published in South Mississippi Outdoors and Recreation, July 2004)

* * *

Much more information on the barrier islands of Mississippi is available in my book, Exploring Coastal Mississippi. Although Hurricane Katrina drastically changed the man made structures on the coast and rendered much of the marina and services information in this book obsolete, the natural features of the islands were less affected and the information published about them is still useful.

"A boat is freedom, not just a way to reach a goal."
Bernard Moitessier - A Sea Vagabond's World

LinkWithin

Related Posts Plugin for WordPress, Blogger...